Windows 11 Start menu ads arrive. How to turn them off.

Windows 11 Start menu ads arrive. How to turn them off.

https://ift.tt/WevR9hJ

Windows 11 logo on phone screen

Sometimes it feels like everything is getting a little bit worse every day. This latest Windows 11 update is a good example of that.

In the patch notes for Windows 11 update KB5036980, Microsoft noted that the start menu in Windows 11 will now display recommended apps from the Windows app store. In other words, they put ads in the start menu.

“The Recommended section of the Start menu will show some Microsoft Store apps. These apps come from a small set of curated developers,” the patch notes said. “This will help you to discover some of the great apps that are available.”

How to turn off recommended apps in the Windows 11 start menu

In case you’re wondering, yes, you can turn this off. Here’s how:

  1. Go to Settings
  2. Click on Personalization
  3. Click on Start
  4. Find the toggle that says “Show recommendations for tips, app promotions, and more”
  5. Turn the toggle off

It’s good that Microsoft gives you the option to straight up disable those ads. Take advantage of it while you can.

Technology

via Mashable https://ift.tt/7Hx3JeG

April 25, 2024 at 01:02AM

How to Convert an Excel Sheet to Google Sheets

How to Convert an Excel Sheet to Google Sheets

https://ift.tt/wyF9Mvn


Want to be able to work on your spreadsheets on the web? If so, convert all your Microsoft Excel spreadsheets to Google Sheets. After you complete this simple process, other people can edit your spreadsheets and you can use Sheets-exclusive functions. Here’s how.

Read This Article on How-To Geek ›

via How-To Geek – Computer Help from your Friendly How-To Geek https://ift.tt/wAzLc14

October 15, 2022 at 12:36AM

How to Create a Call Link on WhatsApp

How to Create a Call Link on WhatsApp

https://ift.tt/v5rmb03

With everyone being so busy on any given day, it’s not easy to get someone to answer a WhatsApp call—not to mention group calls. In the past, if you weren’t able to join a call on time, you had to call someone back, wait for the person to call you back, or align on a suitable time.But it’s now easier to do that. WhatsApp has rolled out call links, which allow users to join an ongoing call. Here’s all you need to know about creating a call link on WhatsApp.

WhatsApp call links are exactly what they sound like. They’re links that users can create for others to join a call. People can join calls at the beginning or while they’re ongoing.

It works similarly to creating a call link for FaceTime, and it’s just as simple to do. WhatsApp call links remove the pressure of joining a call when you’re busy. Instead, you can join a few moments later when you’re free.

It also means that only people relevant to a conversation can be on a call at any given time. For instance, in a group call, several topics might be discussed that aren’t relevant to all participants. In a situation like this, users can join a call only when they’re needed, or when they can benefit from or contribute to the conversation.

If the idea of using new app features intimidates you, don’t worry. Creating WhatsApp call links is easy and anyone can do it. Follow the steps below to get started:

  1. Open the WhatsApp app on your phone.
  2. Tap the Calls button.
  3. Now tap Create Call Link.
  4. Select Call Type and choose between a voice call or a video call.
  5. Now tap either Share Link or Copy Link. If you go with Share Link, you can choose anyone on your WhatsApp contact list to send it to by simply searching for their name in the Search bar. If you opt to go with the Copy Link option, you’ll have to paste the link into your chat with them on a different platform or via email.

That’s it. Now all you have to do is start the call and wait for the person or people you’ve invited to join. Joining a call is as simple as tapping Join Call below the link, and then the Join button on the call preview.

There’s no signing-in required, like on other platforms for conference calls, such as Zoom and Skype. It makes it quicker and easier to join a conversation, especially when joining late.

Some WhatsApp users might not be familiar with call links, so it’s best to let them know beforehand that you’ll be sending them a call link, what it’s for, and how to join a call using one.

Of course, don’t neglect to tell them what time they’ll need to join the call and approximately how long the call might last. This will help them to clear their schedule instead of letting your call go unanswered because they’re busy.

Likewise, if you’ve invited people to a WhatsApp video call, let them know in advance so that they can prepare accordingly.

Finally, only share your call link with people you know and trust. For instance, don’t share it publicly on your WhatsApp status or on your Stories on other social media platforms. This is to avoid bad actors and strangers from joining your call, which could disrupt it and make everyone feel uncomfortable.

Calls Made Easier on WhatsApp

WhatsApp is a great app to connect with loved ones. And it’s become even easier to catch up using WhatsApp’s Call Links feature.

Start connecting with your mates and relatives without putting pressure on them to answer when they can’t. Send them call links, so they can hop on a call when they’re available to chat.

Productivity

via MUO – Feed https://ift.tt/3ieGP2W

November 14, 2022 at 03:09AM

5 Microsoft Outlook Tips That Will Let You Focus On Your Work, Not Your Email

Have you used Outlook at some point in your career? For many of you, the answer is probably yes.

It may be by your choice, or your workplace may mandate it, but Outlook is a constant in many of our work lives.

Here’s how things usually go through: you start your job, get set up with Outlook, start using it for email and calendar and… that’s about the extent of your experimentation. You maybe set your signature and your Out of Office message, and you create some folders, but hey — you have your actual job to do.

Who has time to worry about tweaking Outlook when you have to deal with what is in those emails?

I get it, and lucky for you, AE (and the AE community) is filled with people who do like to go digging through settings and checkboxes. We’ve helped thousands of people with their productivity and a lot of time that comes down to sorting out email and improving calendar skills.

Those are both important, but there is a lot of power in becoming more proficient with the tools that you use to get your job done. If Outlook is one of those tools for you, this article will give you several tips to become faster and more efficient at using Outlook, so you have more time and attention for the things that are truly important for you.

How I Learned To Optimize Outlook

I have used Outlook in many jobs in my career. During my accounting and software developer days, I used it, but my use was pretty typical: since neither of those jobs was email-heavy, I could get by with just the default settings and my simple folder structure.

It wasn’t until I joined a financial software company and worked in Customer Success that I realized I needed to do something. I went from light email jobs to a role that was almost entirely email-based. I spent all day in Outlook and knew I needed to be more productive.

I started playing, testing, tweaking, and I’m sure I was annoying to my coworkers by trying to help them be more productive too.

Some things I learned:

  • Keyboard shortcuts are one of the highest leverage things you can learn. For almost no effort (just a bit of repetition), if you can learn the keyboard shortcuts for the most common things you do in Outlook, you will be able to fly through your inbox. Shortcuts to start with:
    • Ctrl-1, Ctrl-2/⌘-1, ⌘-2 to flip between Inbox and Calendar
    • Ctrl-r/⌘-r to Reply
    • Backspace to Archive
    • Delete/⌘-delete to Delete
    • Alt-S/⌘-enter to Send
  • Rules in Outlook are awesome (more on that soon)
  • Creating massive, elaborate folder structures is a waste of time. It is much, much faster to learn to search for specific contacts, companies, and parts of emails.

A Handy Outlook Resource

Before I share our 5 Outlook Tips, I would be remiss if I didn’t point you to our popular Optimize Outlook resource. It has videos to take you through the tips we share in this article, as well as much, much more.

Click here to learn more about Optimize Outlook.

The Hardest Part of Writing About Outlook

Outlook is a great program (many people think of me as an “Apple guy,” but believe it or not, I like Outlook and Microsoft 365 in general!), but the hard part about creating this Outlook guide is that the versions are entirely different.

We try to be as cross-platform as possible, but anyone who has used multiple versions of Outlook will tell you that the Windows version is far, far more fully-featured than the Mac version.

Throw in Outlook Mobile and the fact that even the terminology between platforms is different, and guiding you becomes a challenge.

I’ll do my best to be cross-platform, but there will be some cases where a feature is only available on Windows, and I will try to make it clear when a feature is called one thing on Windows and something else on the Mac. Ah, technology.

5 Outlook Tips That Will Make You More Productive

1. Set Up Selective Notifications

It is almost impossible for us to talk about email in particular and focus in general without recommending that you turn off notifications whenever a new email comes in. Nothing kills your focus or causes overwhelm like email notifications.

The problem is, turning off email notifications causes FOMO, and for some people may seem impossible. They are conceptually okay with disabling them, but they feel they need to be responsive to their boss, their spouse, or their important client.

With selective notifications, you have your notifications turned off except for specific people or types of email.

How to do it:

On Mobile:

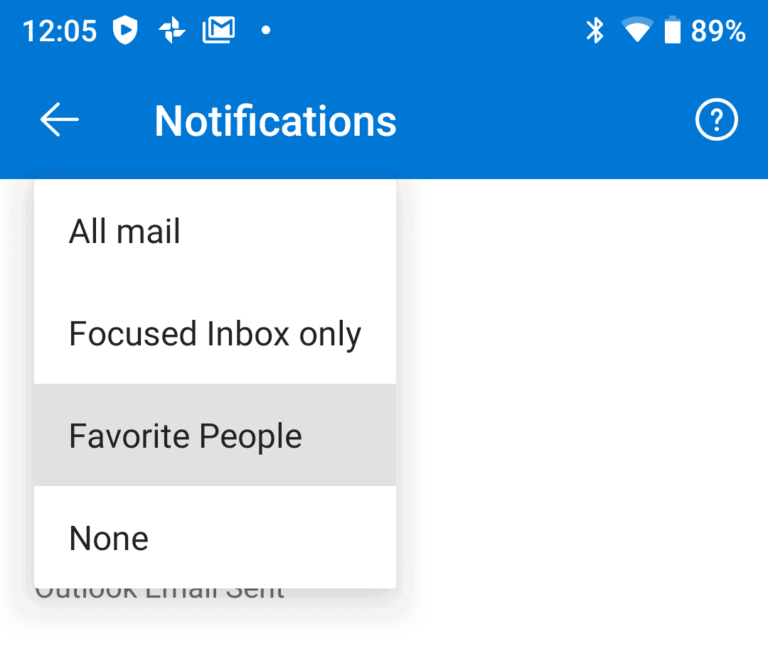
  • Tap on a contact in Outlook. There’ll be a Star icon in the top right that you can tap. The contact will then be marked as a Favorite.
  • Go to Outlook Mobile settings and set Notifications to Favorite People. You’ll get mobile notifications for only those people.

Outlook Mobile Favorite People

On Windows:

  • Right-click on an email from the person you want to be notified by
  • Go to Rules > Create Rule…
  • Check Display in the New Item Alert window and/or Play a selected sound

Outlook Selective Notifications Windows

On Mac:

  • Go to Tools > Rules…
  • In the Client Rules section, hit the + sign to create a new Rule
  • Choose the desired contact and the Do the following: section choose Display Notification

Outlook Selective Notifications Mac

We also have Apple Mail instructions for this same feature explained here.

2. Auto-File Blank Meeting Responses (Windows only)

Have you ever been in this situation: you send a meeting invite, and then your email inbox is cluttered by responses whenever someone accepts or declines.

The thing is, you can see all that information in the Meeting itself. You don’t need to be bombarded by people just clicking “Accept.” You likely only care about the exceptions: did someone decline? Did someone accept or decline but type a note in response?

You can have it so that if someone just clicks “Accept” with no comments, it gets auto-deleted.

How to do it:

  • Go to File > Options > Mail > Tracking
  • Check Automatically process meeting requests and responses to meeting requests and polls
  • Check Update tracking information, and then delete responses that don’t contain comments

Outlook Remove Blank Meeting Responses

For other nifty email hacks, check out this blog post.

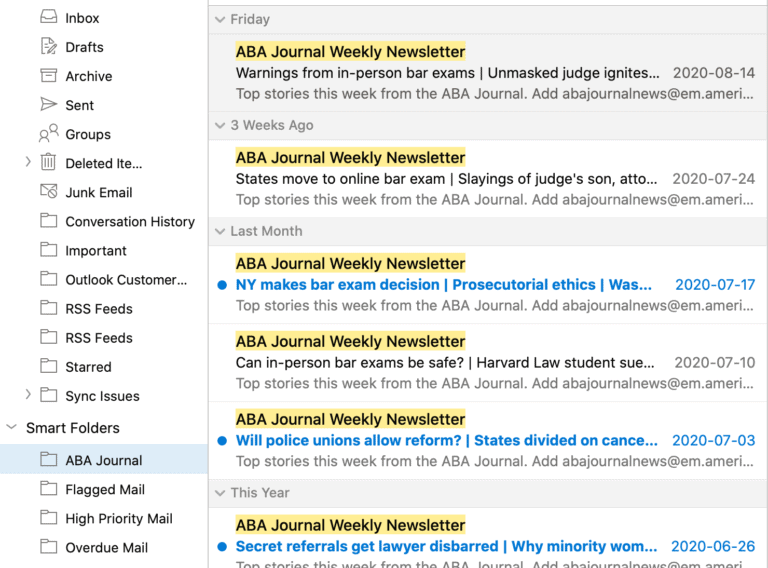
3. Create a Search Folder

This is one of those strange naming situations. The feature is called a Search Folder in Windows and a Smart Folder on Mac. Who knows why.

Do you have frequent searches you do, or do you want a way of bringing together emails even if they are stored in different places?

Search or Smart Folder is a saved search – one click, and you have access.

You may be searching for a frequent sender — maybe a vendor or colleague. Or perhaps you frequently search for emails that have a particular project code or severity in them.

How to do it:

Mac:

Do a search and then hit the Save Search button. You can then give it a meaningful name, and it will be in the Smart Folders (Mac) section on the sidebar.

Outlook Mac Smart Folder

Windows:

Right-click on the Search Folders section of the sidebar. Choose New Search Folder. Go through the wizard to use one of the pre-defined searches, or choose Create a custom Search Folder at the bottom to define your own.

Outlook Search Folder

Once you create it, it will be in the Search Folders section of the sidebar.

4. Change Outlook Mobile swipe actions

Mobile devices aren’t great for email management, but they’re just fine for email triaging.

You can quickly knock off emails that you want to delete or archive, and leave the ones you want to dig into for when you are back at your desktop.

The problem is it can take a lot of tapping, and that’s where swipe actions come in.

If you’re looking at a list of emails, you just know that there are some you can delete without reading, some you want to archive, or some you want to take some other action on like snoozing or marking read or unread.

With swipe actions, you can do that without having to open up the email.

By default, if you swipe right, it will delete the message, and if you swipe left, it will archive it. Like many things in Outlook, you can customize this.

How to do it:

  • In Outlook mobile, go to Settings > Swipe Options
  • For both left and right, you can choose:
    • Delete
    • Archive
    • Flag/Unflag
    • Mark Read/Unread
    • Move
    • Snooze
    • Read & archive
    • Nothing

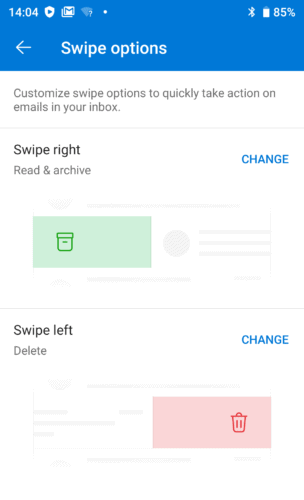
For what it’s worth, I have Read & archive for Swipe right and Delete for Swipe left.

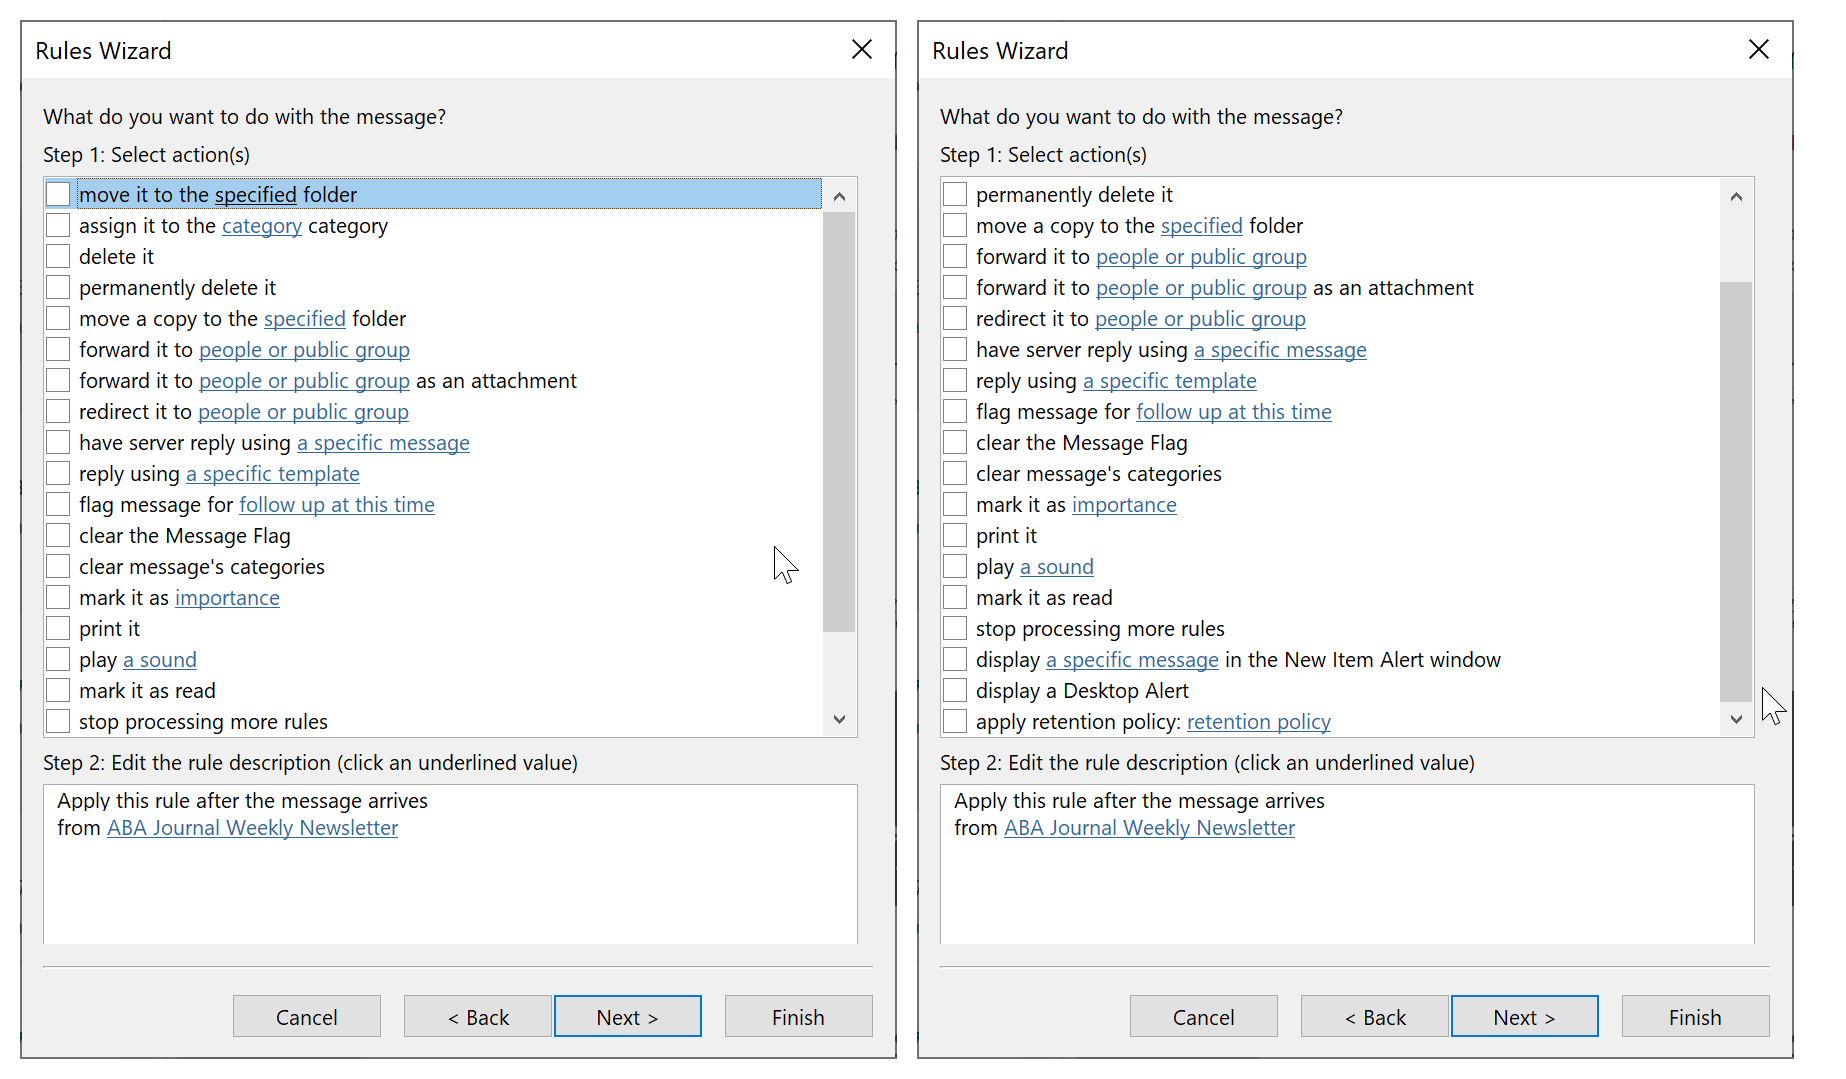
5. Become A Rules Wizard

Outlook (the Windows version anyway) has one of the most powerful Rules system of any email platform.

Yes, Mac Outlook has Rules too, but they’re not quite as sophisticated as on Windows.

You can keep your inbox uncluttered and remove steps from your workflow by setting up rules to handle those repeating emails that we all receive.

Here are some examples:

  • Selective Notifications as we talked about earlier
  • Automatically flagging emails from a particular client or boss
  • Automatically archiving newsletters or updates that you want to keep, but don’t need cluttering up your inbox
  • Putting emails that are cc’ed to you instead of directly to you into a folder
  • Put anything with the word “Receipt” in a receipts folder
  • Always forward email from a specific contact to someone else in your organization
  • Always forward certain receipts or other types of emails to Evernote, OmniFocus, a web-based task manager, an accounting system, or your bookkeeper

How to do it:

As you’ve seen earlier, there are three ways to create rules:

  1. Right-click on an email and create a rule based off of that email
  2. Click Rules on Outlook’s ribbon and create a new Rule from scratch
  3. (Mac only) Go to Tools > New Rule… from the menu bar and create a client or server-side rule. You’ll find that Client rules (which means Outlook needs to be running) will have more options.

Here’s an example of what you can do with Rules on Windows:

Check this blog post for more ideas on email rules and filters.

Some Bonus Tips

There are so many ways you can be more productive with Outlook, and we had trouble limiting it to just five. Here are some more areas we recommend you look at:

  • Quick Steps (Win only) — automation in Outlook!
  • Clean Up (Win only) — get rid of endlessly repeated replies
  • Automate using Microsoft Power Automate or Zapier — apply web automation to Outlook
  • Create Zoom and Microsoft Teams meetings right from Outlook (hat tip Dojo member Katie)
  • Send emails to OneNote to mark up and take notes (hat tip Dojo member Lisa)

Next steps

The risk of giving you a laundry list of tips like this is that it can be overwhelming. It can be tempting to skim through and think — “Nope. I have better things to do than try to figure all this out.”

We highly recommend that you don’t try to implement everything all at once. Start with one tip (I’d recommend Rules), implement, get the benefit from it, and then you can move on to the next one.

And if you need an extra helping hand, Optimize Outlook can take you through it step by step.

via Asian Efficiency https://ift.tt/2FCw5ws

The Ultimate Guide to Creating, Managing and Securing Your Passwords

Pass­word hacks are becom­ing increas­ing­ly com­mon and mak­ing sure that your pass­words are strong and your online accounts secure has become more impor­tant than ever. This guide is your one-stop resource for every­thing you should know about secur­ing your passwords.

Here at Guid­ing Tech, we spend inor­di­nate amounts of time in research­ing and exper­i­ment­ing with stuff, so that you don’t have to. That results in some amaz­ing con­tent, like this 9000-word ulti­mate guide.

via Guiding Tech https://ift.tt/3epH2xp

Top Five Calculator Tips for iPhone

Most iPhone users will be aware of their device’s built-in calculator, but not everyone will know some of the tricks that you can perform with the app that can save you time. Here are some of our favorite tips.

Subscribe to the MacRumors YouTube channel for more videos.

1. Swipe to Delete Numbers

It’s a common misconception that if you type the wrong number into the Calculator app, you have to start the whole sum all over again. Happily, that isn’t the case: Simply swipe right or left with a finger across the number display to remove the last number you typed, and repeat the action if necessary to remove several numbers.

calculator

2. Scientific calculator

The default calculator app includes a built-in scientific calculator that you can use to perform logarithms, square roots, trigonometric calculations, and more advanced math equations.

calculator

To access the scientific calculator, simply rotate your iPhone to landscape mode. If it’s not showing up, make sure the portrait orientation lock is disabled in Control Center. To switch back to the regular calculator, rotate your phone to portrait mode.

3. Copy and Paste

You don’t need to memorize the results of your calculations to input them into other apps. Use the clipboard functions instead – just long press on the number field to copy or paste the result.

calculator

4. Copy Last Result

If you’ve switched to another app, you can still quickly paste the last figure that you calculated without returning to the calculator to copy it.

calculator

Using either a swipe up or a swipe down, launch the Control Center on your iPhone, then long press the Calculator button, and you’ll see a handy option to Copy Last Result.

5. Spotlight Calculations

Did you know that calculator functions are built into Spotlight Search on your iPhone?

spotlight

Simply swipe down from the Home screen to bring up Spotlight, and you can perform basic calculations by typing them directly into the Search field at the top of the screen without having to open the Calculator app.

Bonus Tip for Apple Watch Users

The Calculator app on Apple Watch comes with a couple of additional features that make short work of calculating how much you should tip and how much each person in a group owes if you’re splitting a bill.

The steps below show you how it’s done. Note that the two features can be used together, but you can also use them independently by selecting a 0% tip and changing the number of people, or changing the tip and leaving the People field set to 1.

  1. Launch the Calculator app on your Apple Watch.
  2. Enter the total amount of the bill.
  3. Tap the TIP button in the top-right corner, just left of the divide button.
  4. With the Tip field highlighted in green, turn your watch’s Digital Crown to change the percentage.
  5. To split the bill between a group of people, tap People and then use the Digital Crown to change the number (the maximum is 50).

You’ll see the total amount below the two fields change to reflect your tip adjustments, and the amount below that will change depending on how many people are paying.

Here’s another little tip: If you don’t use the TIP function, you can actually change the button on the calculator layout to a standard percentage (%) function. Simply press firmly on the main calculator screen and tap either Tip Function or Percent.
This article, “Top Five Calculator Tips for iPhone” first appeared on MacRumors.com

Discuss this article in our forums

via MacRumors https://ift.tt/2YorMKV

Does Windows 10 Need Antivirus When You Have Windows Defender?

With the Windows 10 update came the new Windows Defender Security Center. It’s
more functional than previous versions and has extra features such as a SmartScreen
Filter
and parental controls system. It also manages Windows Firewall,
a program that protects you from external threats.

Due to its feature-packed nature, you must be wondering if you still need a third-party antivirus and security suite to safeguard you against various threats. Is Windows Defender enough to keep you safe?

The Short Answer Is….

If you’re on the lookout for a top-notch
antivirus, Windows 10 has you covered already. This edition can keep you secure especially if you’re
often downloading files from social media or websites.

This is because the people behind it have
acknowledged the past threats to cybersecurity. After that, they figured out a
way to resolve them.

Windows Defender Security Center comes with
ongoing and comprehensive security. With it, you don’t have to install other
security software to protect your system. It is designed to increase the
security for Windows 10 users, as well as users of Surface devices such as
Surface Pro 3 and 4.

Here are two such examples of how Windows
Defender can protect your system.

How To Set Up Data Execution Prevention

There’s a type of attack that can
cause an attack on your operating system despite the difficulty in finding the
elements it needs to find to be successful. This is because this attack
involves accessing certain elements by memory.

The solution, therefore, is to configure how
data is executed. The idea is to stop code from being run from data-only memory
pages.

In Windows 10, you can find the settings for Data
Execution Prevention.
In previous editions of Windows, you couldn’t find
them and some other protective settings.

An advantage of having it around is that you
can use it to make life hard for the writers of malicious software. What you
can do is set it to completely wipe out attacks that hide malicious code.

To start things off, tap the Windows key and launch Windows Defender Security Center.

There, go to App & browser control.

Scroll to the bottom to Exploit protection. Click Exploit protection settings.

Under Data Execution Prevention (DEP), choose On. By default, it might already be on. But in case it isn’t, this is where you change it.

How To Set Up Ransomware Protection

Ransomware is malicious software that can
invade your system and block access to authorized users. With this kind of
cyberattack, the invasion will only stop when you pay the ransom.

Fortunately, Windows 10 can improve your
security from this kind of threat. Its recent edition of Windows Defender is
built to protect you from ransomware. But ransomware protection isn’t on by
default. So it’s on you to turn it on.

Tap the Windows key and launch Windows Defender Security Center.

Go to Virus & threat protection.

Scroll down until you come across Ransomware protection. Open this section.

Look for Controlled folder access. Now, turn it on.

via Help Desk Geek | Help Desk Tips for IT Pros https://ift.tt/2U65eM8

Reader mode in Chrome !!

With version 75 Google Chrome has introduced “Reader” mode. i.e. strips out the Advertising in the web page to make it more readable and distraction free

To enable it you need to open a New Tab and enter

chrome://flags/#enable-reader-mode

Then enable the same in the dropdown box

to use the Reader mode , click on the Hamburger Menu on the Right side and choose DiStill page

Hopefully soon this will become a selectable option by default in the near future.

via Blogger http://bit.ly/2QQsaxi

Search Gmail by Time / Date ?

Search for messages sent during a certain time period, just enter as below in the search bar in GMAIL

after:

before:

older:

newer:

Example: after:2017/04/16

Example: before:2017/04/18


Search for messages older or newer than a time period using d (day), m (month), and y (year)

older_than:

newer_than:

Example: newer_than: 10m