Apple’s ‘My Photo Stream’ Service Shuts Down on Wednesday, Here’s What You Need to Do

Apple’s ‘My Photo Stream’ Service Shuts Down on Wednesday, Here’s What You Need to Do

https://ift.tt/gvOl0kX

Apple last month announced that its “My Photo Stream” service is set to shut down on Wednesday, July 26, 2023, which means customers who are still using that feature need to transition to using iCloud Photos before that date. Keep reading to learn what it means for you and whether you need to take action.

What is My Photo Stream?

Originally launched in 2011, My Photo Stream is a free service that when enabled temporarily uploads images (up to 1,000 at any given time) to iCloud, making them accessible across your Apple devices and available for importing to your library on any device. Photos remain in My Photo Stream for 30 days and are then automatically deleted from ‌iCloud‌.

My Photo Stream was later replaced by iCloud Photo Library (now ‌iCloud Photos‌) and Apple is now shutting down the My Photo Stream service on Wednesday, July 26, 2023.

To prepare for the shutdown, Apple stopped photo uploads to My Photo Stream on June 26, 2023, so any images uploaded to the service before that date will remain in ‌iCloud‌ for the usual 30 days until the shutdown point.

What Do I Need to Do?

If you already use ‌iCloud Photos‌, you don’t need to do anything – your photos are already uploaded and stored in ‌iCloud‌. However, if you’re not sure, you can check that ‌iCloud Photos‌ is enabled on all of your devices.

On iPhone and iPad

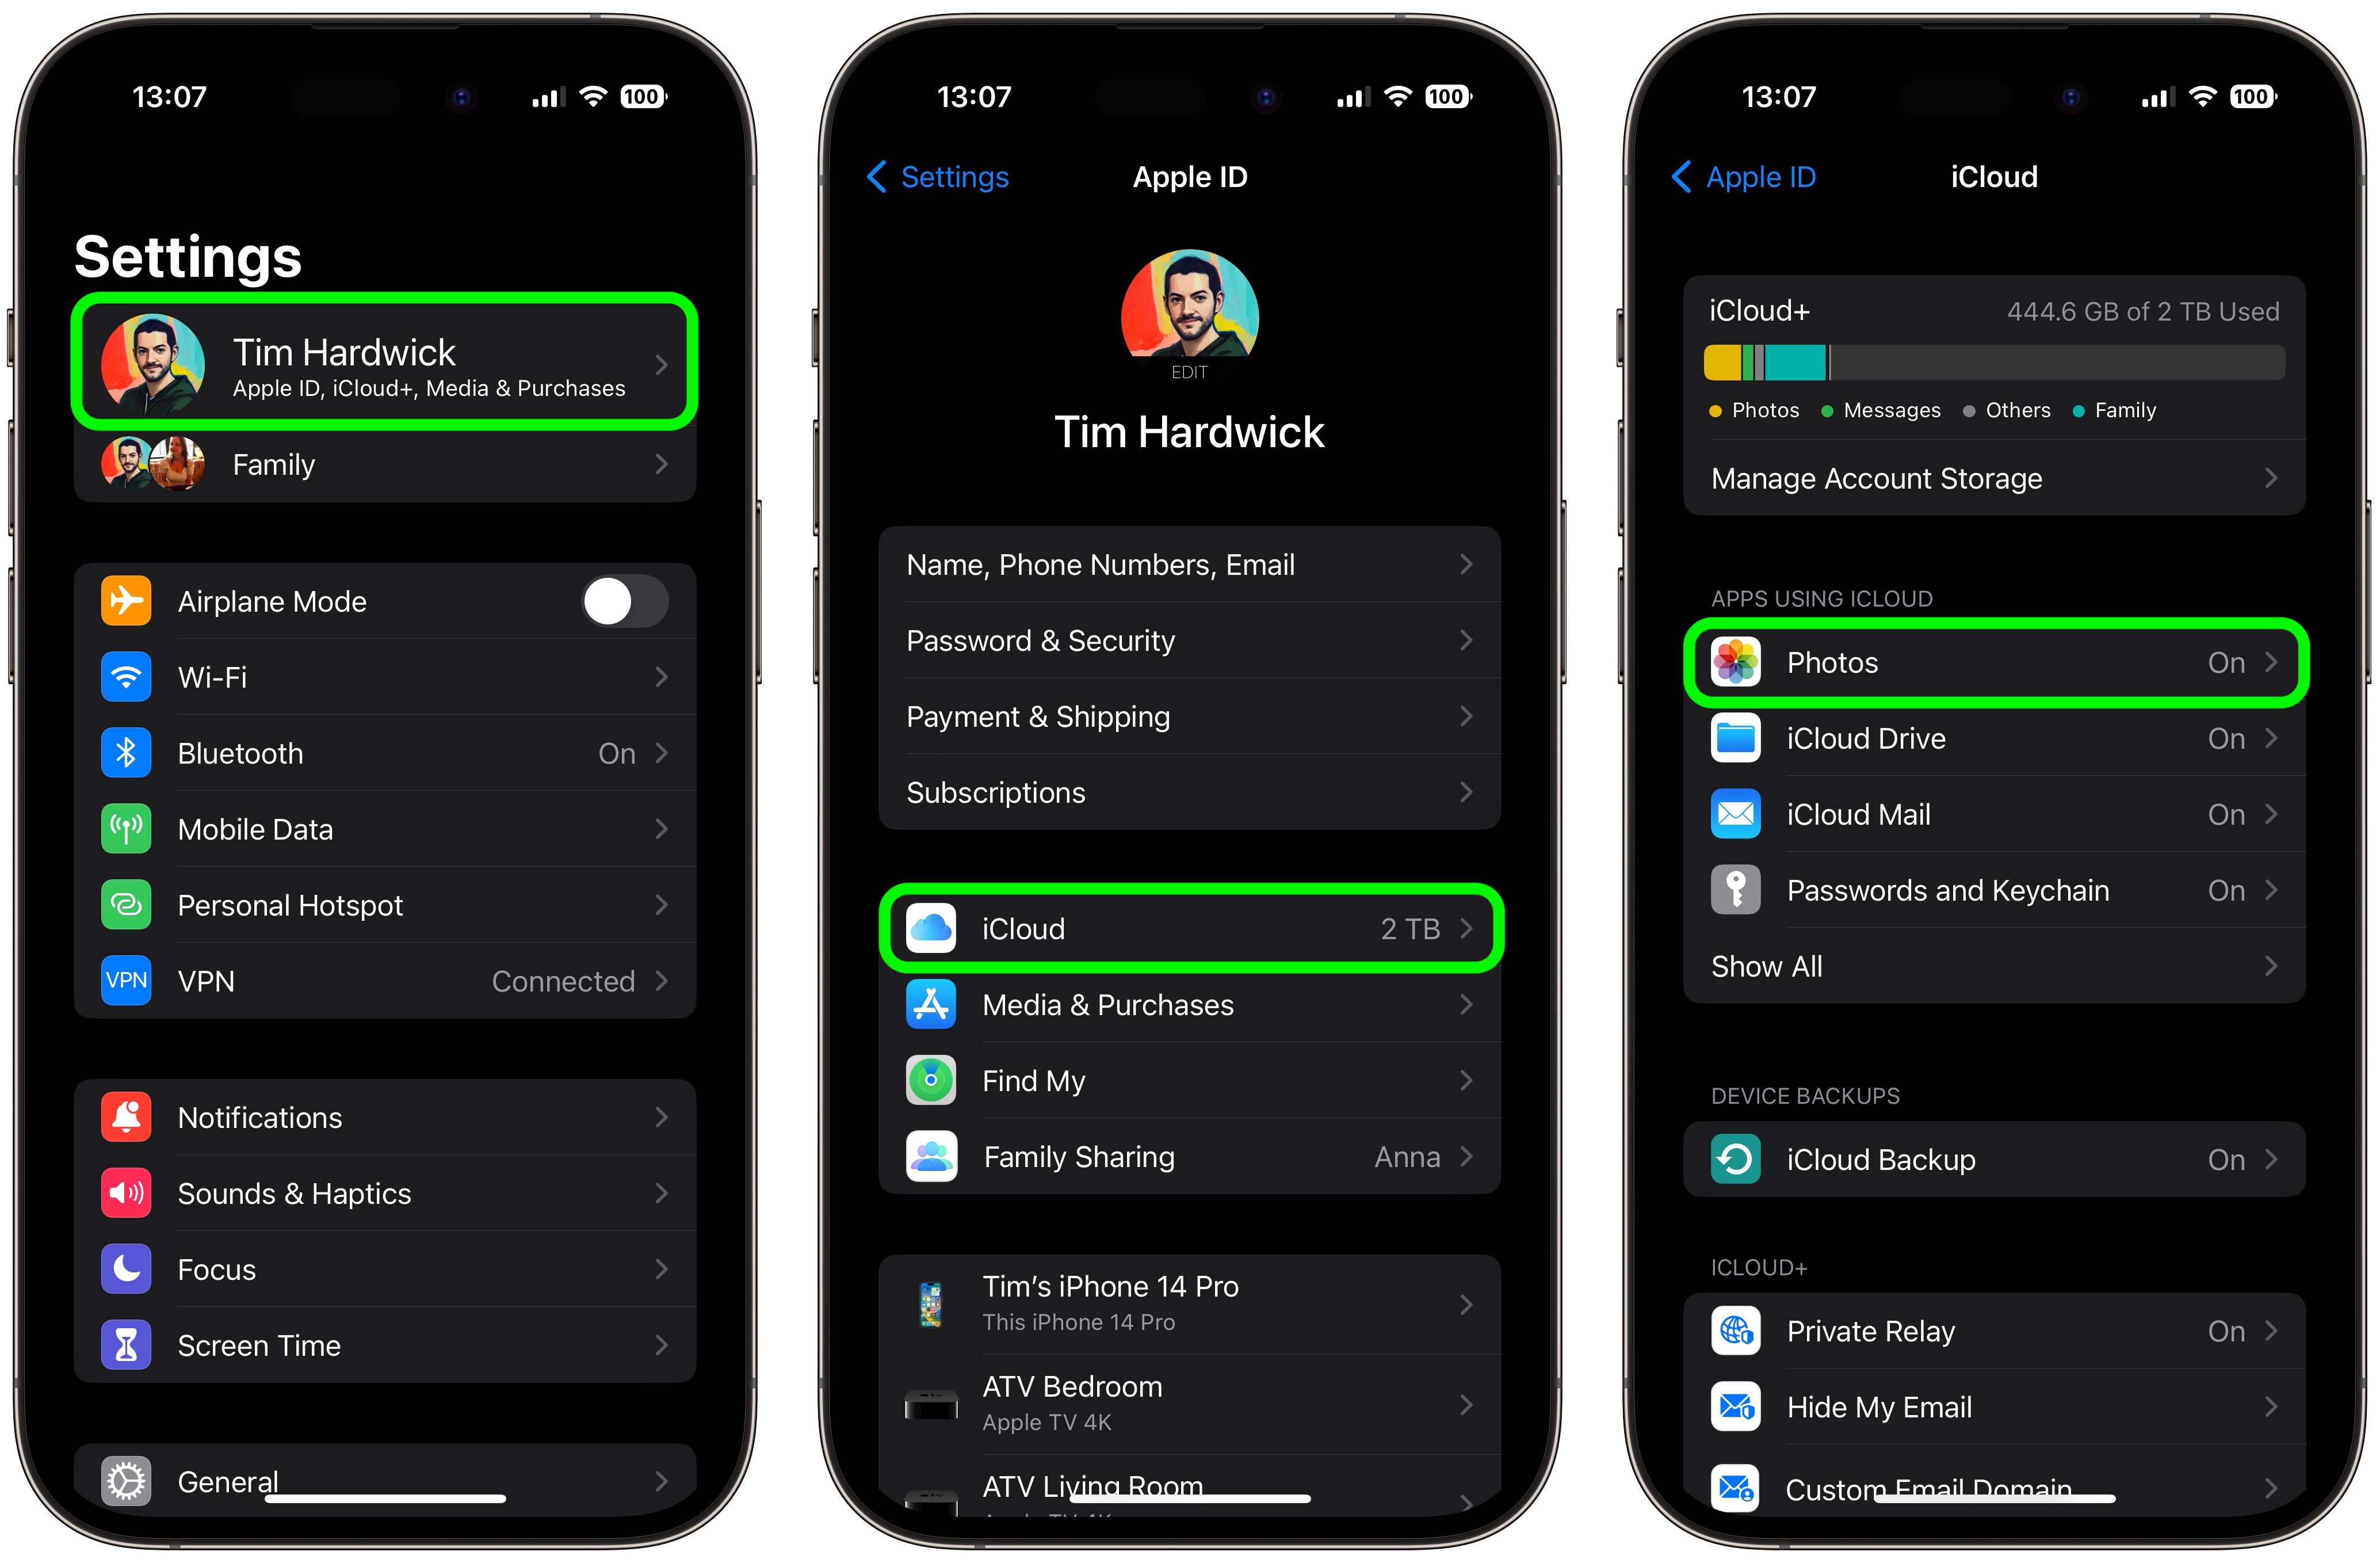
  1. Open the Settings app and tap your Apple ID at the top of the menu.
  2. Tap iCloud.
  3. Make sure that it says “On” next to Photos.

settings

On Mac

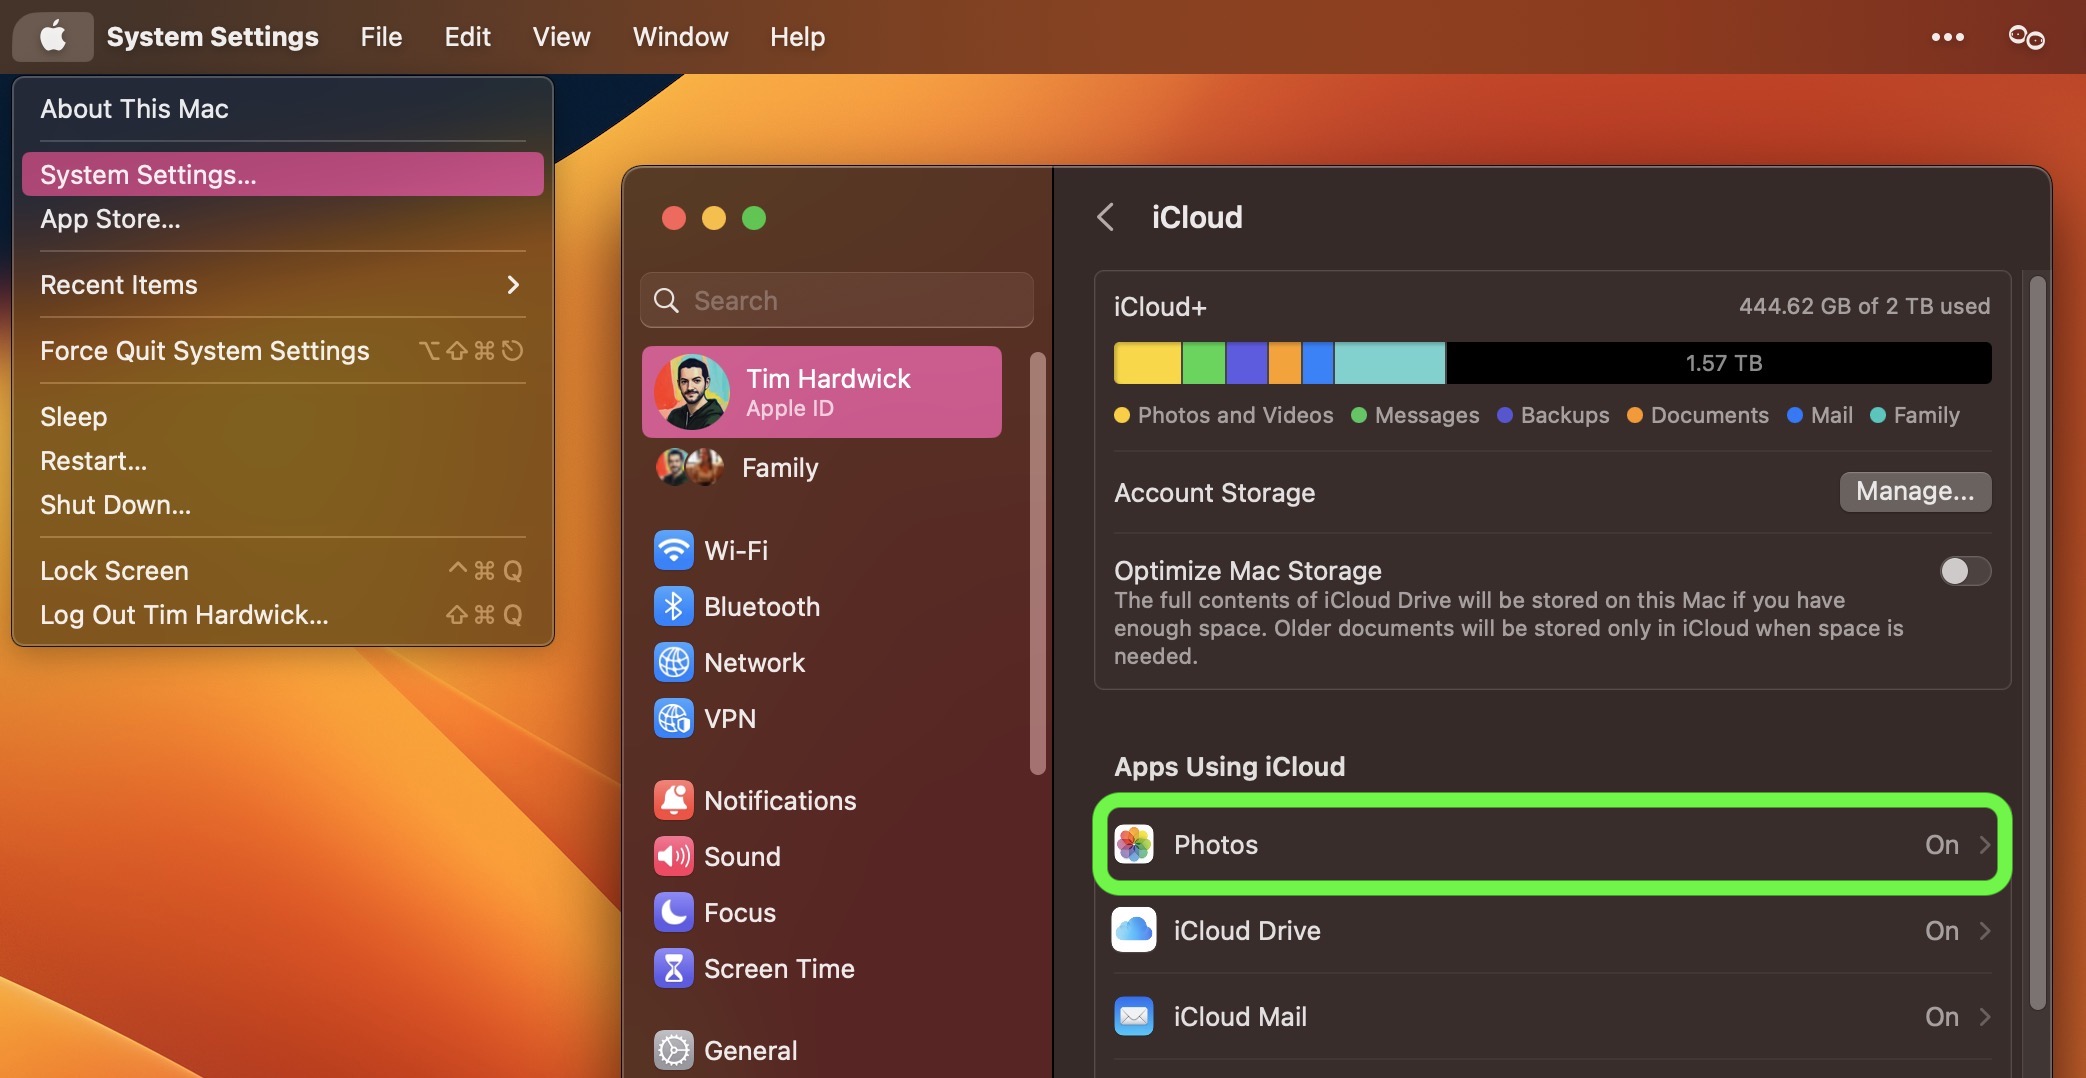
  1. Click the Apple symbol () in your Mac’s menu bar and choose System Settings.
  2. Click your ‌Apple ID‌ name at the top of the sidebar.
  3. Click iCloud.
  4. Make sure that it says “On” next to Photos.

settings

What to Do If You Don’t Use iCloud Photos


‌Photos‌ in My Photo Stream are already stored on at least one of your devices in their original format, so as long as you have the device, you won’t actually lose any photos when the service shuts down.

However, what you will lose is the ability to access these images on any device. If any photos you want aren’t already in your library on a particular iPhone or iPad, one option is to turn on ‌iCloud Photos‌ using the steps above.

Note that ‌iCloud Photos‌ requires a paid ‌iCloud‌ subscription to go beyond the free 5GB ‌iCloud‌ storage limit, and it‌ is only available on iPhones and iPads running iOS 8.3 or later and Macs running OS X Yosemite or later.

Alternatively, you can save photos in My Photo Stream to your library on a particular device, as long as you do it before July 26. The following steps show you how.

Saving ‘My Photo Stream’ Photos to Your Photo Library

  1. Open the ‌Photos‌ app and tap Albums.
  2. Tap My Photo Stream, then tap Select.
  3. Tap the photos that you want to save, then tap the Share button (the square with an arrow pointing out).
  4. Choose Save Image.

If you own a Mac, you don’t have to do anything – My Photo Stream photos automatically import to your library.

This article, “Apple’s ‘My Photo Stream’ Service Shuts Down on Wednesday, Here’s What You Need to Do” first appeared on MacRumors.com

Discuss this article in our forums

apple

via MacRumors https://ift.tt/ihdvR3Q

July 25, 2023 at 06:00PM

The Ultimate iOS 16 Walkthrough: Guides and How Tos for Every New Feature

The Ultimate iOS 16 Walkthrough: Guides and How Tos for Every New Feature

https://ift.tt/opzcyDA

During the iOS 16 beta testing period, MacRumors wrote a series of in-depth feature guides highlighting every new addition in the update, along with how that walk you through using the new features.

This is a comprehensive guide with all of our coverage, and it’s a great resource for casual users who haven’t had a chance to test out ‌‌iOS 16‌ prior to its launch. Everything is organized by app or feature to make it easy to find what you might be looking for, and for those of you with iPads, many of these features are also available in iPadOS 16, with the exception of Lock Screen customization.

Lock Screen Customization

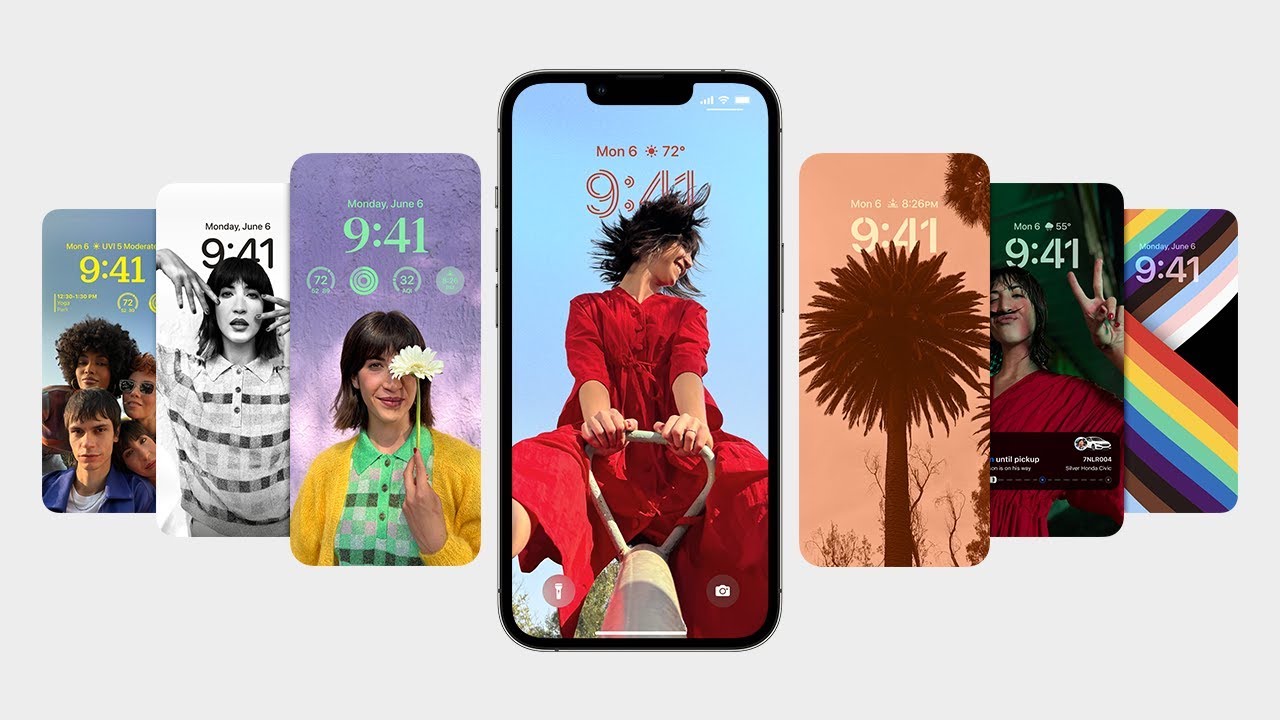
With ‌iOS 16‌, Apple overhauled the iPhone‘s Lock Screen, introducing one of the biggest visual changes we’ve seen on the ‌iPhone‌ in years. You can set custom wallpapers, change the font of the time, and even choose widgets that you can view on the Lock Screen.

We have a guide on all of the new changes with the Lock Screen, and a long list of how tos that will help you set up your ‌iPhone‌ Lock Screen to suit your needs.

Messages App

Apple added a number of highly requested features to the Messages app in ‌iOS 16‌, including iMessage editing, undo send, and Mark as Unread, plus the Messages app now supports SharePlay.

Our dedicated Messages guide covers everything that’s new with the Messages app in ‌iOS 16‌.

Focus

The Focus experience has been improved in ‌iOS 16‌, making it easier to set up Focus modes. Focus modes can now be linked to different Lock Screens and Home Pages, for more customizability when you’re doing different things.

Everything new with the Focus app is explained in our iOS 16 Focus guide.

Safari

With the latest version of Safari, it’s now possible to pin tabs, just like you can on the Mac, plus shared Tab Groups are now supported. Apple is working on replacing passwords with Passkeys, a more secure authentication method, and web push notifications are coming to iOS devices.

Our iOS 16 Safari guide details everything that’s new with the Safari browser.

Mail App

Like Messages, the Mail app in ‌iOS 16‌ gains some features that are much needed to bring it in line with competing apps. An Undo Send feature gives you 10 seconds to change your mind on an email, and there are options for scheduling an email, and getting notified about missing attachments.

For a full rundown of everything new in the Mail app, we have a dedicated iOS 16 Mail app guide.

Maps

The ‌iOS 16‌ Maps app brings long-awaited multi-stop routing feature, plus it includes some new transit features and interface updates. For a full list of everything that’s new in Maps in ‌iOS 16‌, we have a dedicated guide that lists the changes.

Siri

Siri has new capabilities in ‌iOS 16‌, such as automatic message sending and the ability to insert emoji in when you’re sending a text or an email, plus Apple has made some major improvements to dictation. Our full iOS 16 Siri guide lists all of the new features, and we’ve also highlighted relevant how tos below.

Health and Fitness

iOS updates often include new health and fitness-related features, and ‌iOS 16‌ is no exception. Sleep tracking has improved, and there’s a dedicated medication tracking feature so that you can keep tabs on what you’re taking and get medication reminders.

Other new features include health sharing invitations and fitness tracking without an Apple Watch, with complete details available in our iOS 16 Health and Fitness guide.

iCloud Shared Photo Library


‌iOS 16‌ introduces iCloud Shared Photo Library to make it easier to share photos with friends and family. A Shared Library is basically identical to a standard personal library but it can support up to five people.

We have full details on everything that you need to know about ‌iCloud‌ Shared Photo Library in our dedicated iCloud Shared Photo Library guide. Apple says that ‌iCloud‌ Shared Photo Library will not be available when ‌iOS 16‌ launches and will instead be coming in an update to ‌iOS 16‌ later this year.

Live Text

Videos in ‌iOS 16‌ support Live Text, allowing you to pause a video and select the text inside like you would in an image. Text in a paused video frame can be copied, pasted, translated, and more.

Other new Live Text features include a live Translate Camera, Quick Actions, and more, with full details in our Live Text guide.

Security and Privacy

With ‌iOS 16‌, there are a number of security and privacy-focused updates that include landscape Face ID, Security Check, faster security updates, Passkeys, and more.

We have a dedicated Security and Privacy Guide that highlights every new feature you need to know about.

Notes and Reminders

Apple hasn’t spent a lot of time talking about the new features in Notes and Reminders in ‌iOS 16‌, but Quick Notes now work on ‌iPhone‌ for the Notes app, notes can locked with a device passcode, and there are updated smart folders.

As for Reminders, lists can be pinned, there’s a completed smart list that shows finished tasks, and you can save and load list templates. A full overview of everything new in Notes and Reminders is available in our guide.

Photos and Camera

The Photos app has all kinds of neat feature additions, such as the option to copy and paste edits and more secure hidden and recently deleted albums that are biometrically locked.

There’s an option to delete duplicate photos, the people album can be sorted alphabetically, and for the Camera app, there’s now an option to use it for real-time translations.

A complete list of everything new in Photos and Camera can be found in our guide.

Spotlight Search

There’s a new “Search” button right on the Home screen in ‌iOS 16‌ to make it easier to get to Spotlight search, plus it now supports Quick Actions for doing things like starting a timer, activating a Focus, or running a Shortcut.


‌Siri‌ suggestions have improved, and when Live Activities launches in the future, Spotlight will be able to start a Live Activity trackable on the Lock Screen. There are also more rich results and improvements to image search, with a full rundown on Spotlight available in our Spotlight guide.

Weather App

The Weather app now lets you tap into any of the Weather modules to get way more information on metrics like temperature, precipitation, air quality, UV index, and more, plus there’s a dedicated Weather Lock Screen and weather widgets to add to any Lock Screen.

If you want to know more about the Weather app, we have a dedicated Weather app guide.

Guide Feedback

Have questions about ‌iOS 16‌, know of a feature we left out, or want to offer feedback on this guide? Send us an email here.

This article, “The Ultimate iOS 16 Walkthrough: Guides and How Tos for Every New Feature” first appeared on MacRumors.com

Discuss this article in our forums

apple

via MacRumors https://ift.tt/ate2hA0

September 13, 2022 at 03:02AM

The 5 Best Encrypted Messaging Apps for Android and iOS

The 5 Best Encrypted Messaging Apps for Android and iOS

https://ift.tt/apNKwQ3

Today, most of us rely on smartphone apps for communication, but many of these apps do not encrypt our messages, meaning third parties outside your conversation could see them. This is why it’s worth using an encrypted messaging app if privacy is important to you.If you’re wondering which of these privacy-oriented apps are the best right now, we’ve listed the top five encrypted instant messengers below to help you out.

1. WhatsApp

You’ve probably heard of WhatsApp before. This is a hugely popular encrypted messaging app with over two billion users worldwide. WhatsApp allows you to communicate with people in your phone contacts using a Wi-Fi or mobile data connection. You can even make audio and video calls for free using WhatsApp.

On top of this, you can post statuses on WhatsApp, add a profile picture, and even select a custom background for your chats. But WhatsApp’s focus isn’t on personalization. Instead, it’s on privacy and security.

WhatsApp uses end-to-end encryption to ensure that your messages and calls stay strictly between you and the recipient. Additionally, the app offers many extra safety features, such as two-step verification and security notifications, and lets you choose who sees your profile picture, bio, and status.

It’s a great all-around app for communicating with your friends, relatives, and colleagues while keeping your data safe.

Download: WhatsApp for Android | iOS (Free)

MAKEUSEOF VIDEO OF THE DAY

2. Signal

Signal messenger is another solid option for those who want to stay connected while staying private. With Signal, you can text, audio, and video call anyone in your phone’s contact list free of charge while having all your data encrypted between you and your recipients. The app is also powered by a non-profit, meaning you don’t have to worry about having your data sold behind the scenes.

You can also create group chats and group calls using Signal and link multiple devices together so that you can access your account even when you’re not using your phone. On top of this, Signal has now introduced its Payments feature, which is currently in its beta phase. This allows you to send MobileCoin, a cryptocurrency, through Signal to make payments. So, if you’re into crypto, this feature might be useful for you.

But let’s get to the security element. Of course, Signal encrypts your messages and calls, but what else can it offer?

The additional security features provided by Signal include an incognito keyboard, screen lock, and a login PIN, all of which allow you to keep your data safe while keeping your communication private.

Download: Signal for Android | iOS (Free)

3. Telegram

Telegram is an up-and-coming messenger app that offers you the benefit of end-to-end encryption. Using Telegram, you can make texts and calls to anyone in your phone’s contact list, create group chats and calls, and even save messages to your cloud storage to quickly access them when required. On top of this, you can join local, public group chats to connect with more people.

You can also personalize your Signal profile in many ways and link your Signal account to other devices so you can get in touch with your contacts on any device you choose. You can even choose to delete all your old chats if you’ve been inactive on the app for a certain period of time. However, it’s important to note that Signal will delete your conversations either way if you have been inactive for more than a year.

Signal also offers two-factor authentication and can password-protect your account to ensure no one can access it without your authorization.

Download: Telegram for Android | iOS (Free)

4. Wire

Wire’s simple and secure messaging app can be used by anyone to connect safely. Unlike the other apps listed here, Wire gives you the option of signing up either with your phone number or email, and you can search for users you don’t have in your contacts list to get in touch with. In this sense, it works more like Facebook Messenger, just with added security.

Using Wire, you can make audio and video calls on top of its messaging feature, all of which are protected using end-to-end encryption. You also won’t have to worry about being overwhelmed by the app, as Wire’s interface is pretty straightforward. Additionally, you can lock your app with a password to ensure that only you can access your messages.

However, Wire is still considerably less popular than WhatsApp, Signal, and Telegram, so you may find it challenging to connect with your friends and family as they may not have a Wire account of their own. This is a huge limiting factor you may experience while using Wire, but the app is becoming more popular by the day.

Download: Wire for Android | iOS (Free)

5. Wickr Me

Wickr Me is another example of a lesser-known secure messaging app, but this doesn’t mean it’s not a viable option for you. With Wickr Me, you can both call and text your friends, family, or colleagues, and great group chats or “Rooms” to connect with multiple contacts at once. The app also has a clean and minimalistic interface, so it’s easy to use for people of all ages.

Note that when you initially install Wickr Me, it won’t allow you to take in-app screenshots for security purposes. However, if you want the option of taking screenshots, you can enable this feature in your account settings.

Wickr Me uses your phone’s contact list to allow you to communicate, so keep in mind that you’ll have to give the app access to your contacts if you want to use it. But Wickr Me offers the benefits of a password-protected login, multiple device connections, and a message lock to keep your data safe while making communication easy and convenient.

Download: Wickr Me for Android | iOS (Free, premium version available)

Give These Apps a Try If Privacy Is Your Top Priority

Various organizations are looking to get their hands on your data these days, and therefore, it’s crucial to ensure that you keep your texts and calls safe when you connect with your contacts. You’d be surprised at just how common it is for these third parties to take your data without you even realizing it. This is why you should try out one of the apps above to protect your data at all times while socializing online.

The 5 Most Secure and Encrypted Email Providers

Read Next

About The Author

Katie Rees
(234 Articles Published)

Katie is a Staff Writer at MUO with experience in content writing in travel and mental health. She as a specific interest in Samsung, and so has chosen to focus on Android in her position at MUO. She has written pieces for IMNOTABARISTA, Tourmeric and Vocal in the past, including one of her favourite pieces on remaining positive and strong through trying times, which can be found at the link above. Outside of her working life, Katie loves growing plants, cooking, and practicing yoga.

More

From Katie Rees

Subscribe to our newsletter

Join our newsletter for tech tips, reviews, free ebooks, and exclusive deals!

Click here to subscribe
Productivity

via MUO – Feed https://ift.tt/iJZwzMs

April 13, 2022 at 06:20PM

How to See Better With the iPhone’s Magnifier App

People with poor eyesight can still struggle to interact with people and their surroundings despite using glasses or contact lenses.

While squinting or going near an object usually does the trick, you can save yourself from the hassle by using a helpful tool that turns your iPhone into a magnifying glass—the Magnifier.

Discover below what Magnifier can do, how to enable it, and how to use its various features.

What Is Magnifier?

While the Magnifier app has been on iPhones since iOS 10, many people don’t that it exists buried in their iPhones utilities, let alone knowing how to use it.

Magnifier is one of iPhone’s several accessibility features designed for people with visual impairments. The app helps people perceive objects better, like texts and symbols, by using various features.

Related: Apps to Help the Blind and Visually Impaired to Navigate Better

How to Enable Magnifier

While it’s a built-in feature, you can’t access Magnifier like other built-in apps. The tool is turned off by default. To turn it on:

  1. Go to Settings > Accessibility.
  2. Tap Magnifier.
  3. Toggle the switch on.
Image Gallery (2 Images)

Accessibility Magnifier
Expand
Accessibility Magnifier Toggle On
Expand

How to Quickly Access the Magnifier

There may be times that you instantly need help in seeing small texts. The good thing is, you can access Magnifier through various options.

From Your Homescreen

Image Gallery (2 Images)

Magnifier App on HomeScreen
Expand
Magnifier in App Library
Expand

Once enabled, the Magnifier tool will appear on your Home Screen as a magnifying glass app. If you can’t see it there, look it up in the App Library. Remember, you won’t be able to find the app unless you first enable it in Settings.

Through Accessibility Shortcuts

Accessibility shortcuts allow you to triple-click the Side button to use specific accessibility features.

After you enable Magnifier on your iPhone, it will immediately be added to your Accessibility Shortcuts.

Related: Useful iPhone Accessibility Features Worth Trying

If you don’t have any other shortcut selected, the Accessibility Shortcut will automatically be configured to Magnifier. However, if you have other shortcuts chosen, Magnifier will be added along with the other shortcuts.

That is, once you triple-click the Side button, you will be asked which shortcut you want to perform. To configure your Accessibility Shortcut:

  1. Head to Settings > Accessibility.
  2. Scroll down to Accessibility Shortcuts.
  3. Choose one of more accessibility features to add.
Image Gallery (2 Images)

Accessibility Shortcut Magnifier
Expand
Accessibility Shortcut Magnifier Ticked
Expand

Through the Control Center

You can also add a Magnifier control to your iPhone’s Control Center. To do this:

  1. Go to Settings > Control Center.
  2. Scroll down to More Controls and look for Magnifier. Tap the plus icon (+) to add it to your Control Center.
Image Gallery (2 Images)

Settings Control Center
Expand
Magnifier Control Center
Expand

Magnifier Tool Features

Magnifier offers more than simple magnification. In fact, you can zoom to different levels, adapt the colors, and more. Here are all the various features on offer in the app:

Zoom

While your iPhone’s Camera has extraordinary zoom capabilities that you can use to magnify a nearby object, Magnifier provides stronger magnification.

Image Gallery (2 Images)

iPhone Camera Zoom
Expand
Magnifier Zoom
Expand

The tool also removes the need to hold your phone steady to focus on the desired object while zooming in. With the Magnifier, simply snap a shot and zoom in and out afterward.

Filters

Magnifier comes with various filters that you can apply either while taking the snapshot or after you take it. You can use these filters to perceive images and texts better.

Filters include Grayscale, Red on Black, Yellow on Black, Yellow on Blue, White on Blue, and their inverted counterparts.

Other Features

Magnifier also has extra options to enhance images further. These include Brightness, Contrast, and Flashlight. To customize controls:

  1. Open Magnifier.
  2. Access Customize Controls by tapping the gear icon in the lower-left of the screen.
  3. Tap the plus icon (+) to activate secondary controls.
  4. You can choose up to two primary controls that will always be shown when you use the tool. To do this, drag a specific control from secondary controls that you want to place on primary controls.
Image Gallery (2 Images)

Magnifier FIlters and Secondary Controls
Expand
Magnifier Customize Controls
Expand

You can also organize the secondary controls based on how they will appear from left to right when using Magnifier. Arrange them by holding the three horizontal bars on the right side while dragging each control to their desired place.

No More Need for Squinting

With Magnifier, you no longer have to strain your eyes to read tiny printed tet. Simply take hold of your iPhone and use it like a digital magnifying glass. Break the visual barriers with just a few taps!

via MUO – Feed https://ift.tt/3uMoLSR

What Are the Orange and Green Dots on an iPhone or iPad?


On an iPhone or iPad, you’ll see orange and green dots at the top right corner of the screen—above the cellular, Wi-Fi, and battery icons—when an app is using your microphone or camera. Here’s what you need to know.

Read This Article on How-To Geek ›

via How-To Geek – Computer Help from your Friendly How-To Geek https://ift.tt/32U22JU

Top Five Calculator Tips for iPhone

Most iPhone users will be aware of their device’s built-in calculator, but not everyone will know some of the tricks that you can perform with the app that can save you time. Here are some of our favorite tips.

Subscribe to the MacRumors YouTube channel for more videos.

1. Swipe to Delete Numbers

It’s a common misconception that if you type the wrong number into the Calculator app, you have to start the whole sum all over again. Happily, that isn’t the case: Simply swipe right or left with a finger across the number display to remove the last number you typed, and repeat the action if necessary to remove several numbers.

calculator

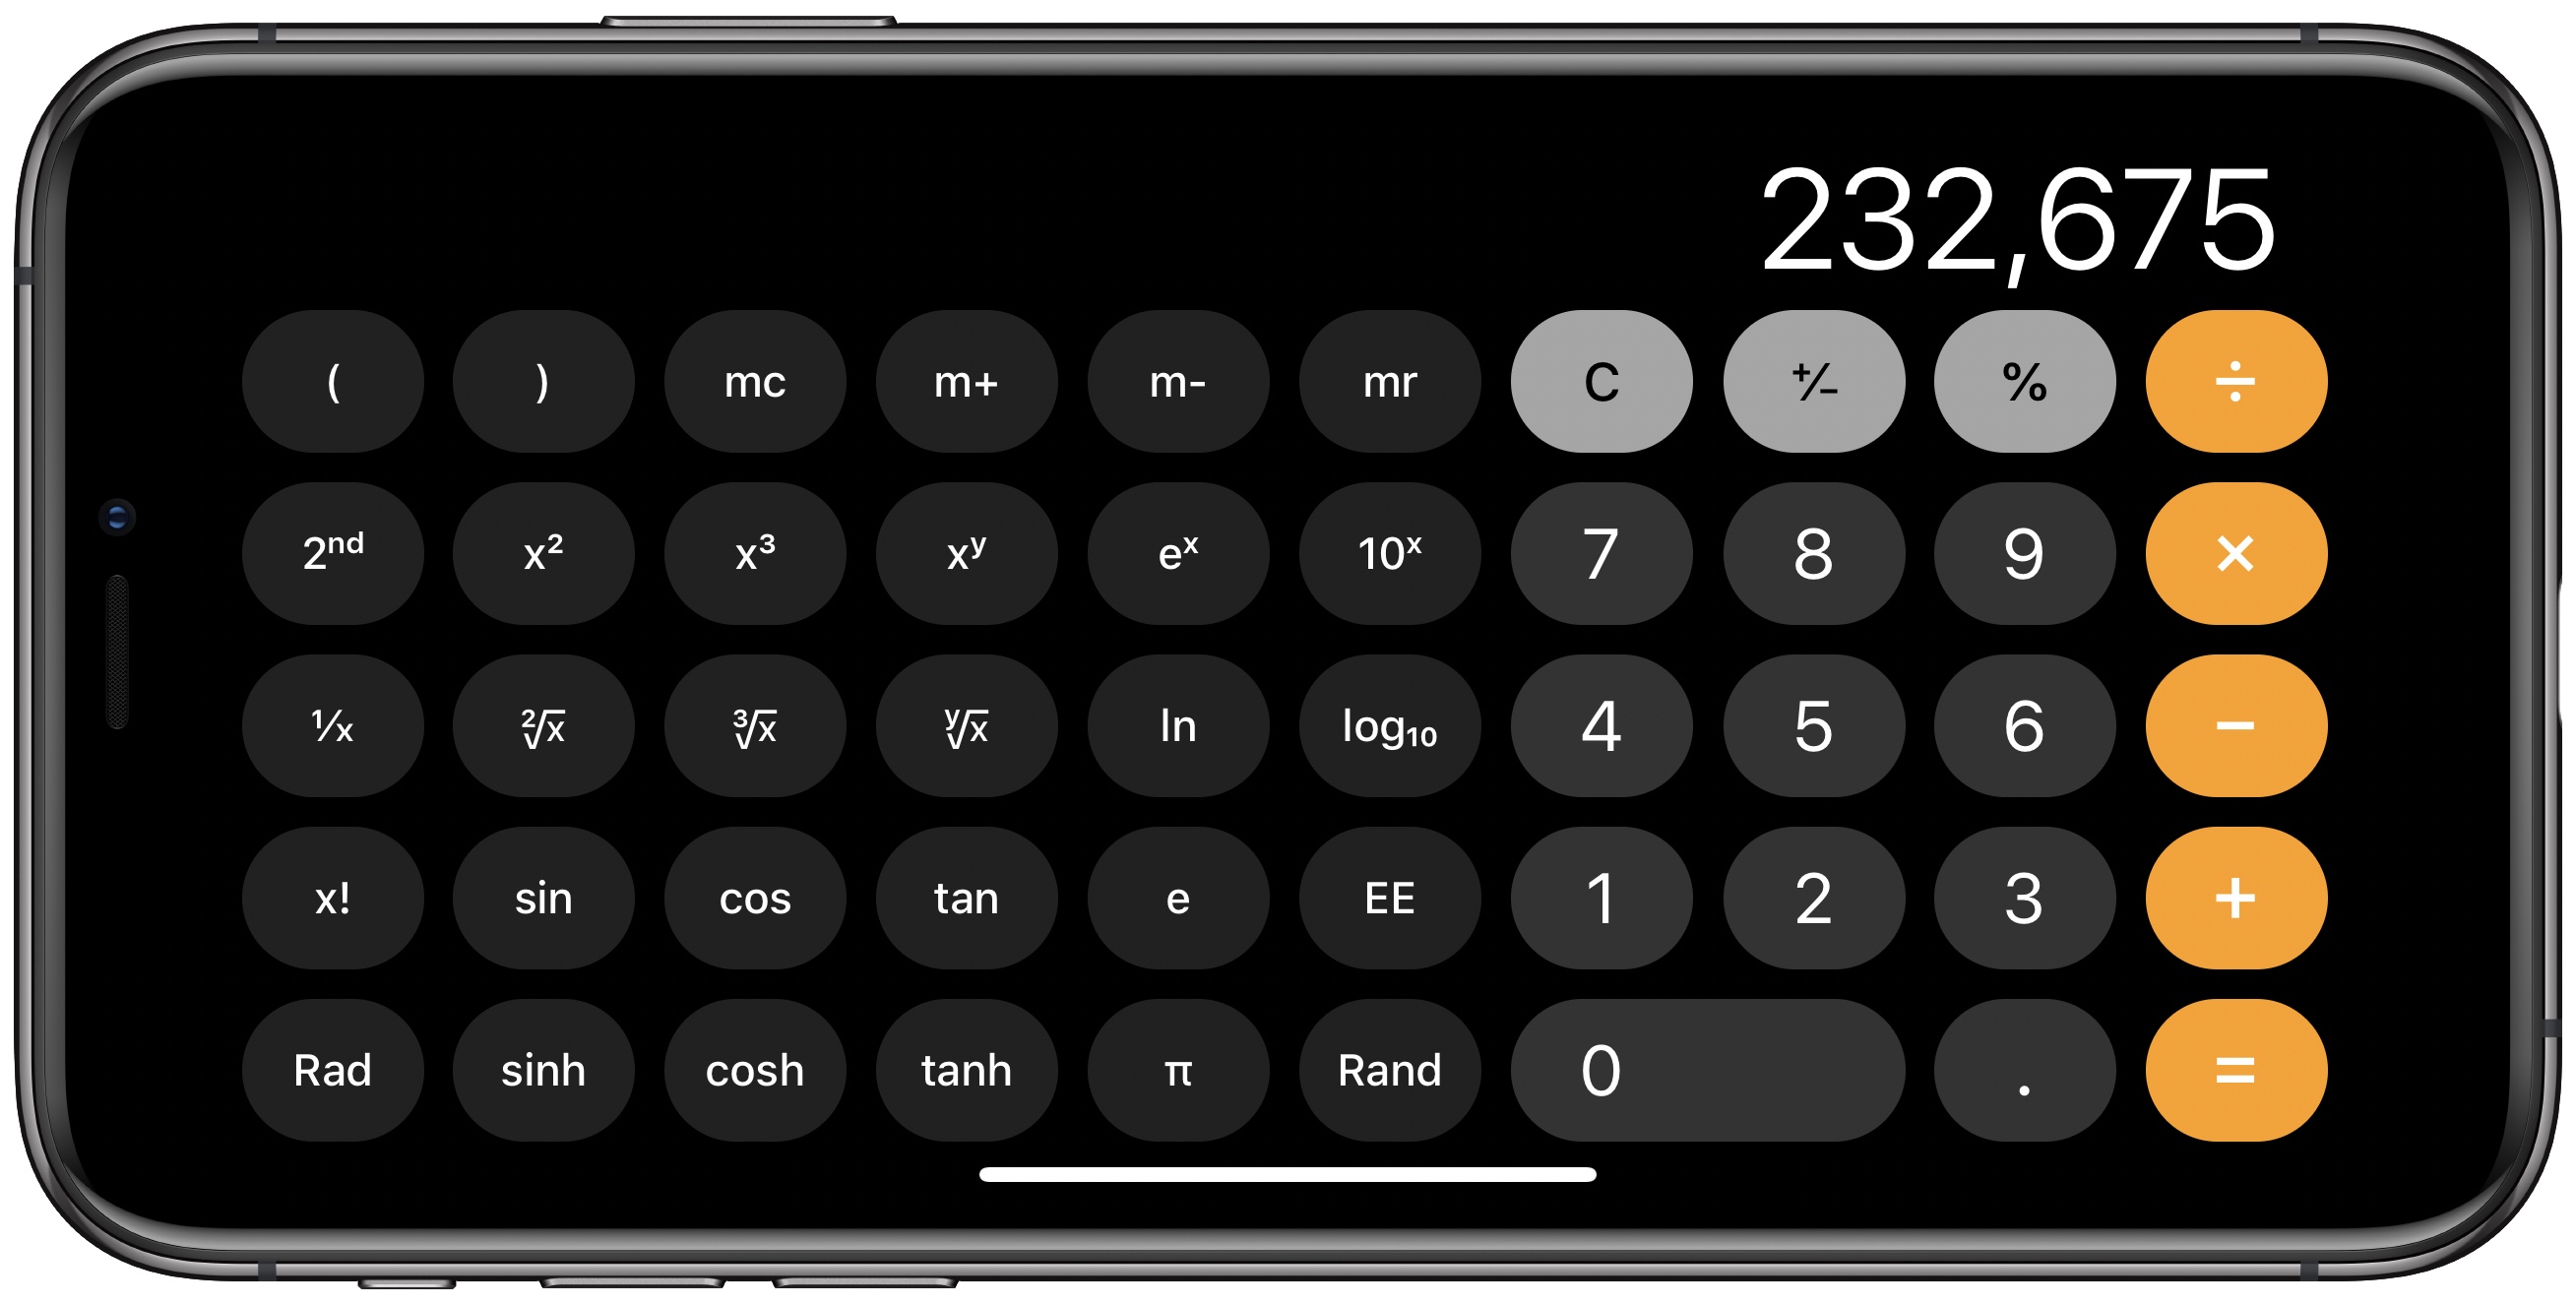
2. Scientific calculator

The default calculator app includes a built-in scientific calculator that you can use to perform logarithms, square roots, trigonometric calculations, and more advanced math equations.

calculator

To access the scientific calculator, simply rotate your iPhone to landscape mode. If it’s not showing up, make sure the portrait orientation lock is disabled in Control Center. To switch back to the regular calculator, rotate your phone to portrait mode.

3. Copy and Paste

You don’t need to memorize the results of your calculations to input them into other apps. Use the clipboard functions instead – just long press on the number field to copy or paste the result.

calculator

4. Copy Last Result

If you’ve switched to another app, you can still quickly paste the last figure that you calculated without returning to the calculator to copy it.

calculator

Using either a swipe up or a swipe down, launch the Control Center on your iPhone, then long press the Calculator button, and you’ll see a handy option to Copy Last Result.

5. Spotlight Calculations

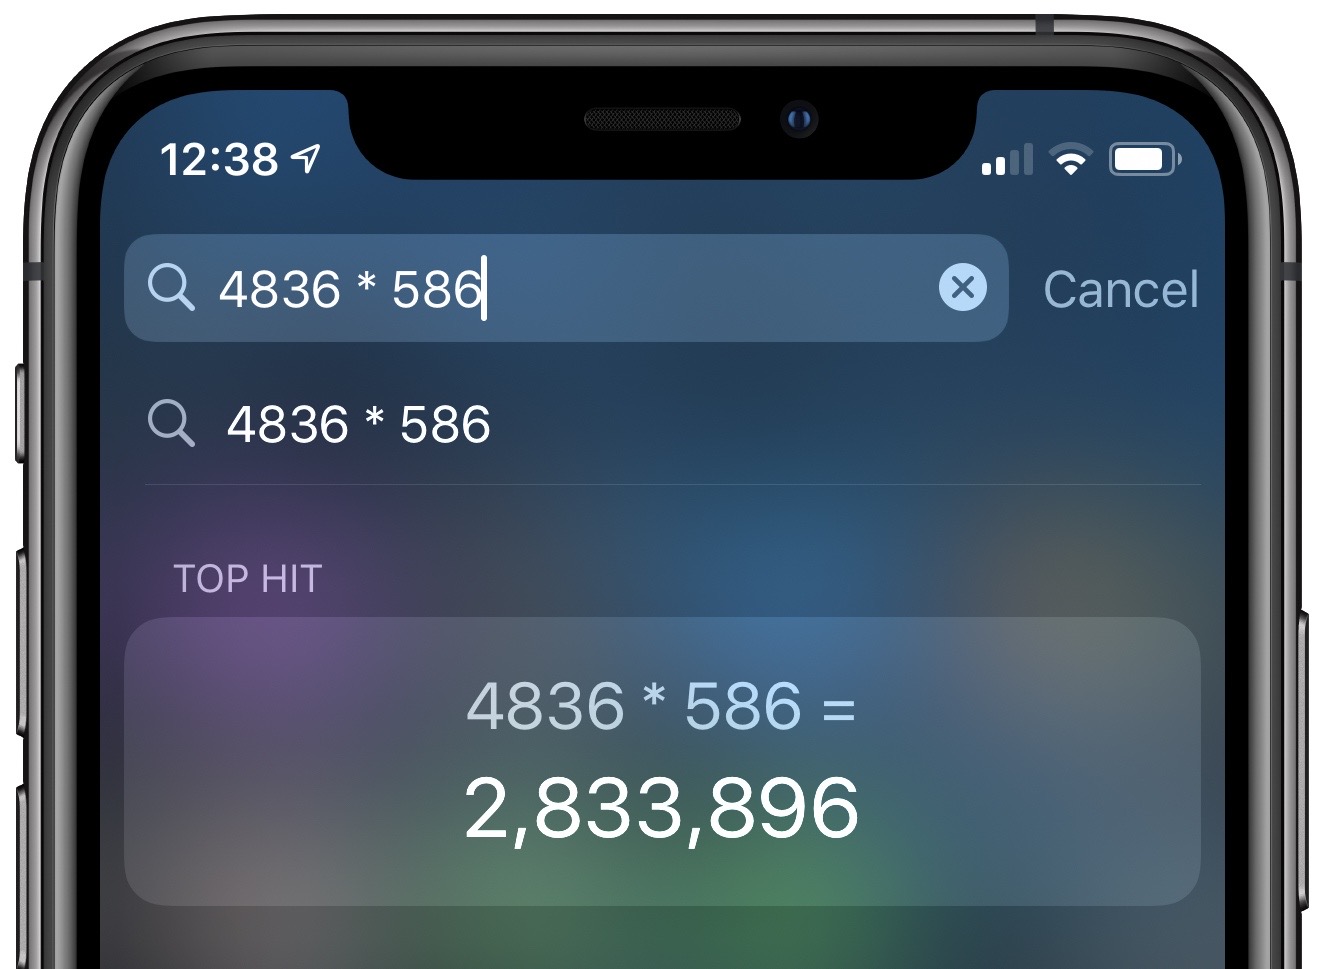
Did you know that calculator functions are built into Spotlight Search on your iPhone?

spotlight

Simply swipe down from the Home screen to bring up Spotlight, and you can perform basic calculations by typing them directly into the Search field at the top of the screen without having to open the Calculator app.

Bonus Tip for Apple Watch Users

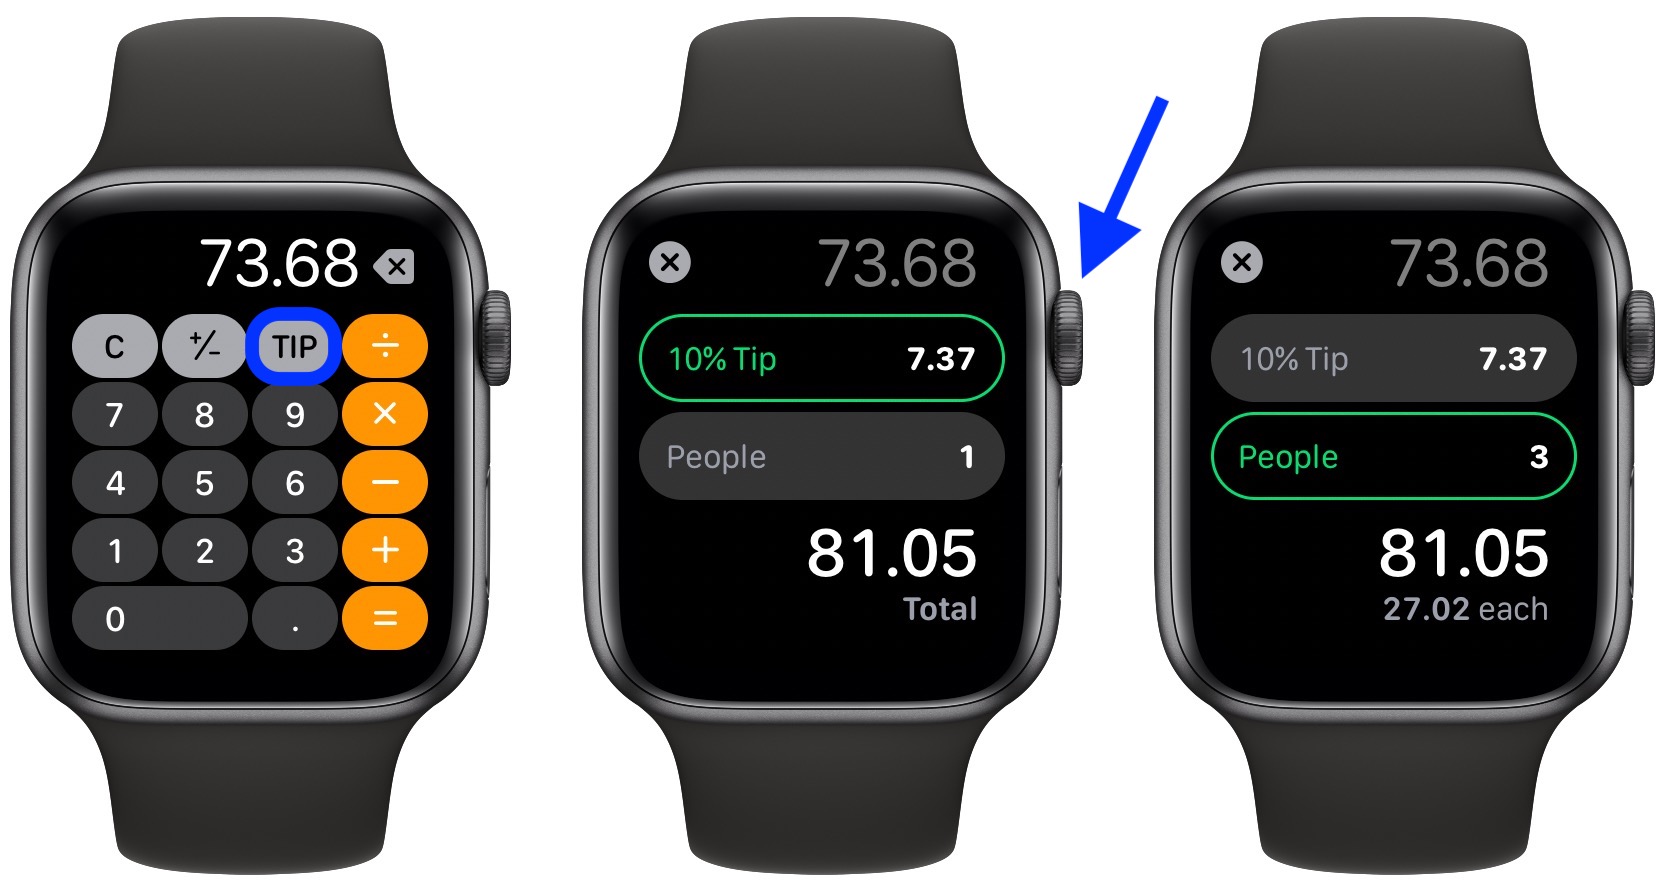
The Calculator app on Apple Watch comes with a couple of additional features that make short work of calculating how much you should tip and how much each person in a group owes if you’re splitting a bill.

The steps below show you how it’s done. Note that the two features can be used together, but you can also use them independently by selecting a 0% tip and changing the number of people, or changing the tip and leaving the People field set to 1.

  1. Launch the Calculator app on your Apple Watch.
  2. Enter the total amount of the bill.
  3. Tap the TIP button in the top-right corner, just left of the divide button.
  4. With the Tip field highlighted in green, turn your watch’s Digital Crown to change the percentage.
  5. To split the bill between a group of people, tap People and then use the Digital Crown to change the number (the maximum is 50).

You’ll see the total amount below the two fields change to reflect your tip adjustments, and the amount below that will change depending on how many people are paying.

Here’s another little tip: If you don’t use the TIP function, you can actually change the button on the calculator layout to a standard percentage (%) function. Simply press firmly on the main calculator screen and tap either Tip Function or Percent.
This article, “Top Five Calculator Tips for iPhone” first appeared on MacRumors.com

Discuss this article in our forums

via MacRumors https://ift.tt/2YorMKV

Free up space on your IOS device

It is now even easier to free up space on your IOS device like iPhones or iPads as long as you are running iOS 11, just go to settings and then go to iTunes & App Store, there just turn on offload unused Apps.

IMG_0161

This only offloads the Apps you have not used in a long time, But keeps the App data so if you ever decide to start using the app, you just need to download it and your previous data will be available.